Printoid for OctoPrint (LITE, PRO and PREMIUM) is an application that controls an OctoPrint server, that is usually used to control one or more 3D printer(s).
This way, Printoid requires to connect to an OctoPrint server. This server is in charge of the user of the app:
- The user installs it by him/herself on the machine of his/her choice (usually on a Raspberry Pi, using the OctoPi pre-built image based on Raspbian – but it can be setup on a Linux / MacOS laptop too)
- The user is in charge to make his/her server accessible to the application – and is in charge to configure the app with his/her own server setup.
Step 1: Setup an OctoPrint server
The generic setup instructions boil down to
- Installing Python 3, including pip.
- Creating a virtual environment somewhere:
python -m venv OctoPrint - Installing OctoPrint into that virtual environment:
OctoPrint/bin/pip install OctoPrint - OctoPrint may then be started through
./OctoPrint/bin/octoprint serveor with an absolute path/path/to/OctoPrint/bin/octoprint serve
More specific setup instructions for the most common runtime environments can be found below.
Linux
For installing OctoPrint on Linux, please take a look at the setup instructions for Raspbian on the forum. They should be pretty much identical on other Linux distributions.
Windows
For installing the OctoPrint server on a Windows system, please take a look at the setup instructions for Windows on the forum.
Mac
For installing the OctoPrint server on a Mac, please take a look at the setup instructions for MacOS on the forum.
Step 2: Configure the OctoPrint server for the first use
- Start the OctoPrint server using the following command:
/path/to/OctoPrint/bin/octoprint serve - Open the following URL on the same machine the OctoPrint server is setup:
https://localhost:5000 - Follow the instructions until the end of the onboarding (use default values as advised by OctoPrint)
Step 3: Configure the Printoid app
Prerequisite: The machine OctoPrint is installed on and the device Printoid is installed on should be connected to the same network.
1. Open the Printoid application and pass through all the discovery screens
2. When “Configuration of your first OctoPrint profile” is displayed, click on the Next button
3. Profile name: put the value of your choice
4. Local IP or hostname (LAN): add the IP on the network of the machine OctoPrint is installed on (ex: 192.168.1.25). You can also click on the Search icon to find the server over UPnP.
5. Local port: Set it to 5000
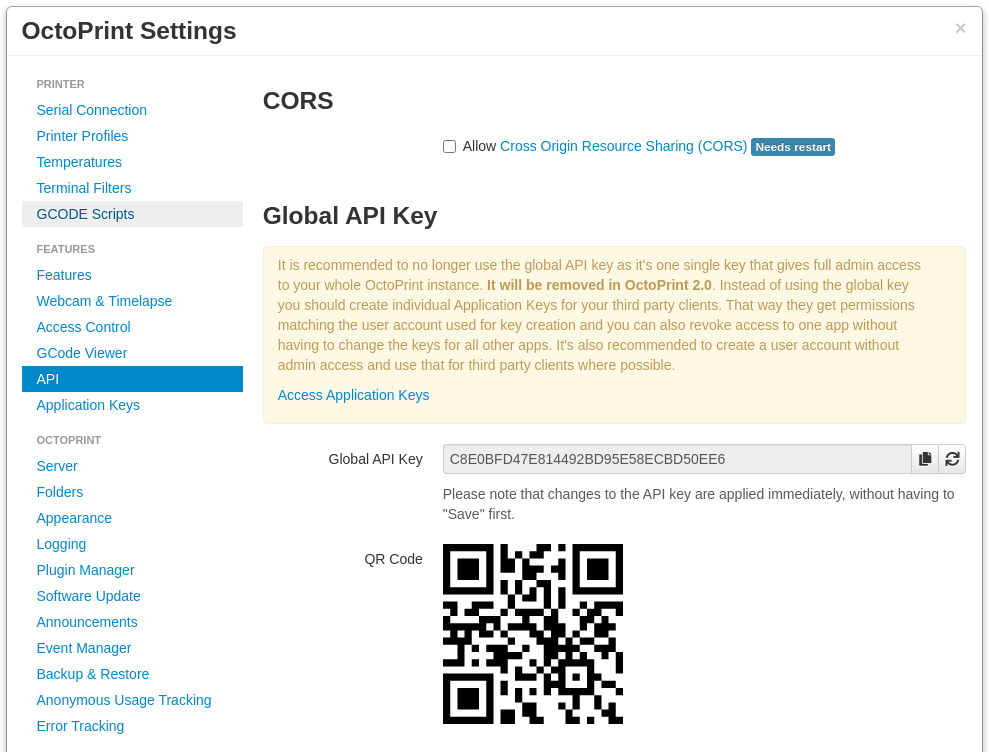
6. OctoPrint API key: from the OctoPrint web interface, it can be found under the Settings button (on the top right) then in the API menu. The Global API key can be used for your tests. (See Figure 1)
7. OctoPrint credentials (optional): You can either skip this step, or provide the username/password you’ve created once configuring the OctoPrint server on first open
8. Distant access (over the internet): You can skip this step for your tests (Configure later)
9. Security (optional): You can skip this step for your tests
10. Secure Shell commands (optional): You can skip this step for your tests
11. Validate
Step 4 (optional): Configure a virtual printer for your tests
Follow the following tutorial to introduce a virtual 3D printer into OctoPrint so you can test the app as if it was connected to a real 3D printer, and enable all the functions in the application:
https://docs.octoprint.org/en/master/development/virtual_printer.html
