Printoid offers you a smart all-in-one interface. Here are the description of the main features from the dashboard.
DISCOVER THE DASHBOARD |
The main page is the landing page when you open Printoid (if you have properly configured the application with at least one OctoPrint server parameters).

TITLE BAR |
The title bar is always present, regardless the panel you’ve opened. It is cut into 4 parts.

The menu icon
By default, the menu icon is displayed. When you click on it, it will open the left menu drawer. You can also open the left menu drawer by a simple gesture from the left border of your screen. You can of course hide this icon from the settings of the app.
The app icon / back icon
The app icon is always showing when you are on the main screen. You can directly visit https://printoid.net by clicking on it. This icon is converted on a “back” arrow when you have opened another panel. You can’t hide this icon.
The server status
This information bar shows you the current state of your OctoPrint server. Information are changing each 3 seconds by default. It shows you the OctoPrint server status, the current temperature values, the file name you are currently printing, etc. You can configure the information to be displayed from the app settings. You can also change the refresh period.
Swipe to the top / to the bottom to switch to the previous / the next OctoPrint profile if you have more than one configured.
The quick-action icons
These actions are really helpful. It allows you to start a panel / perform a specific action without having to open the left drawer menu. You can display up to 3 icons max (or up to 4 icons max if you have hidden the menu icon). These icons can be configured from the app settings.
MONITORING CARD |
This card shows you the progress of your running job when your 3D printer is working.
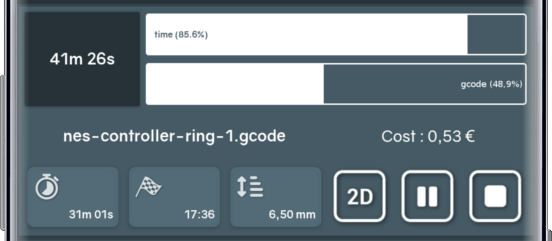
The remaining time
The remaining time is the duration until the current job finishes (if you have a job in progress). It also shows the estimated job time when no job is running and a file is loaded. This value is the time estimation provided by OctoPrint. Printoid does not compute this value by itself.
The time progress bar
The time progress bar indicates the current job progress regarding the time. This value is provided by OctoPrint, Printoid does not compute it by itself.
The loaded filename
If you have loaded a file / or printing something, Printoid shows you the filename. You can click on it to focus on the next part of the filename. You can click on it to input the file’s filament length to a spool of the Filament Spool Manager module. You can long-press it to open the file manager directly on the containing folder of this file.
The job cost
The job cost is an estimation in your selected currency for this job, regarding the power and filament consumption. You can adjust the cost parameters in the app settings.
The elapsed time
The elapsed time is the duration from the beginning of the current job. Nothing is displayed if you have no job in progress. This value is provided by OctoPrint.
The end time
The end time is the estimated time / date when the current job will finish. This value is computed by Printoid regarding the estimated job time and the remaining time.
The Z height
The current Z height indicates the current height of your hot end from your printer plate. You can also display the final Z height for the loaded file by clicking on this card. These values are provided by OctoPrint.
The print button
If you have loaded a file, then this button will be enabled. You can start the printing job of the loaded file by clicking on it.
The 2D simulator button
This button only appears when you have a job running. It allows you to open the real-time 2D simulator for the current job (take care – this is not perfectly accurate and that’s only a simulation according the parameters provided by OctoPrint. It does not really reflects what’s going on your printer plate, but tries to reflect it at its best)
The pause button
The pause button only appears when you have a job running. You can pause the current job. This feature is protected by an alert dialog to prevent hurting your job accidentally.
The restart button
The pause button only appears when you have a job paused. You can directly restart the current job. This feature is protected by an alert dialog to prevent hurting your job accidentally. Be careful, your printer plate shall be empty before restarting the job from its beginning because it will not pre-heat the tools again.
The cancel button
The cancel button only appears when you have a job running or paused. You can abort the current job. This feature is protected by an alert dialog to prevent hurting your job accidentally.
CONTROL CARD |
This card allows you to control your 3D printer axis and tools. Some of the features are only available when the 3D printer is idle (such as axis controls).
Please note that the axis control buttons (X/Y/Z) can be replaced by a joystick from the app settings. In this case, the custom user commands can’t be displayed. The joystick mode allows you to control the axis by directly adjusting the travel distance.

The axis control arrows (X/Y)
You can control the X and Y axis from these buttons. You can invert the commands from the app settings if needed. These buttons are disabled when a printing job is running. The travel distance is define in the “more tools” panel.
The X+Y homing button
You can request a X+Y homing from this button. This button is disabled when a printing job is running. X homing and Y homing are separated in the joystick mode.
The axis control arrows (Z)
You can control the Z axis from these buttons. You can invert the commands from the app settings if needed. These buttons are disabled when a printing job is running. The travel distance is define in the “more tools” panel.
The Z homing button
You can request a Z homing from this button. This button is disabled when a printing job is running.
The extrude button (E)
You can extrude the selected amount of filament for the selected extruder (tool). Amount of filament can be selected from the “more tools” button. Extruder (tool) can be selected from a dialog if your 3D printer has more than 1 extruder (tool). You can also long-press this button to extrude a specific amount of filament without overriding the selected value.
The retract button (R)
You can retract the selected amount of filament for the selected extruder (tool). Amount of filament can be selected from the “more tools” button. Extruder (tool) can be selected from a dialog if your 3D printer has more than 1 extruder (tool). You can also long-press this button to retract a specific amount of filament without overriding the selected value.
The “more tools” button
This button allows you to open the “more tools” panel. In this panel, you can adjust the feedrate, the flowrate, the amount of filament to extrude/retract from the dedicated buttons and the travel distance when clicking on the axis arrow buttons. You also have the possibility to define your own temperature/fan presets.
The ventilation slider(s)
This slider allows you to adjust the ventilation from 0% to 100%. Up to 2 ventilation sliders can be added. You can click on the fan icon above to type your own value (in %). The value can’t be retrieved, that’s why the slider seems stuck to 0% when re-opening Printoid.
The hot bed slider
This slider allows you to adjust the hot bed temperature if available. The max value is defined in the app settings to protect your bed. You can click on the bed icon above to type your own value (in °C).
The hot end slider(s)
This slider allows you to adjust the hot end temperature. Up to 10 hot end sliders can be added. The max value is defined in the app settings to protect your hot end(s). You can click on the hot end icon above to type your own value (in °C).
TEMPERATURE CARD |
The temperatures card shows you the current tools temperatures in a graph and with their associated values / target values. The graph values are automatically retrieved (from OctoPrint) when you open the app, and then the values are updated in real-time.
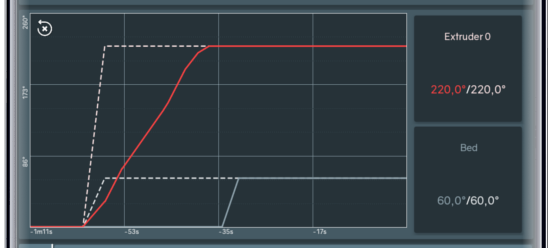
The temperatures graph
The temperature graph plots the temperatures (current values + target values) for each tools, with a dedicated color. You can long-press the graph to open the extended temperature manager panel.
The reset button
This small icon clears the graph content and only the new temperature values will be plotted again.
The temperature cards
These cards show you the current value and the target value for each tool (hot end / hot bed) when available. The color is the same as the color used in the graph. You can click on a card to enter to the extended temperature manager panel with the focus on the edit field for the associated tool.
FILES CARD |
The files card contains all the files & folders retrieved from your OctoPrint server. On the main screen, this is just a reduced files manager. Enter the expended files manager to get a full control on your files.
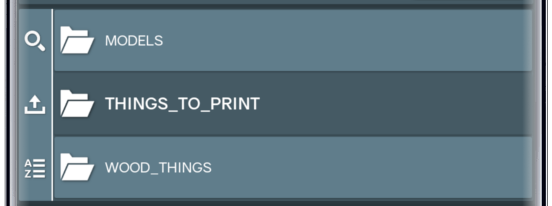
The search icon / back icon
Click on this icon to open the extended files manager with the focus on the search bar and automatically open the soft keyboard. When a folder is opened, this icon is changed for a back arrow icon to leave the folder / go back to the parent folder.
The upload icon
Click on this icon to directly upload a file from your device to your OctoPrint server, on the currently opened folder (or to the root if no folder opened).
The sort icon
This icon allows you to sort the files. Whatever your choice, the folders will be always displayed above the files.
The file list
The file list shows you all your files stored on your OctoPrint server. It fully handles the OctoPrint folders. Click on a folder to open it. Click on a file to show its details and the extended actions.
